(#3) ASP.Net Core + Angular 2 … don’t waste your Razor

When serving up Angular 2 script and views, some people have chosen node.js or ASP.Net core server solutions that pre-render data into the angular views being delivered to the client, other implementations go the other way, adopting a simpler philosophy of just serving ‘flat’ unmodified script and HTML views. A few have gone part way, using webpack to collect bundles of views, styles and code. A few rely on ASP.Net Core to serve data using Web API and generally do not use Razor syntax, Tag Helpers or anything much of ASP.Net Cores’ features.

This series of posts will describe a middle ground, where we’ll leverage as much of ASP.Net Core as we can, give users the responsiveness that comes with Angular – delivering data from Web API and caching views where practical.

In the last step we added Angular, served from flat HTML, and had to browse index.html. Now we switch out index.html and replace this with a standard MVC view and use _layout.cshtml to handle the common content.

The standard ASP.Net Core MVC template has a Views Folder in which, by convention, are a folder corresponding to each controller, and in each folder a .CSHTML view corresponding to each method in these controllers.

Later we’ll add other MVC views but for now, drop out all views except home/index. So the Home controller should now look like this:

using Microsoft.AspNetCore.Mvc;
 
namespace Angular2MultiSPA.Controllers
{
    public class HomeController : Controller
    {
        public IActionResult Index()
        {
            return View();
        }
 
        public IActionResult Error()
        {
            return View();
        }
    }
}

Next go to the views/home folder, edit index.cshtml and change it to this:

<my-app>Loading...</my-app>

Next go the views/shared folder and edit the _layout.cshtml file to this:

<!DOCTYPE html>
< html>
< head>
    <meta charset="utf-8" />
    <meta name="viewport" content="width=device-width, initial-scale=1.0" />
    <title>@ViewData["Title"] - Angular2MultiSPA</title>
 
    < link rel="stylesheet" href="~/lib/bootstrap/dist/css/bootstrap.css" />
    < link rel="stylesheet" href="~/css/site.css" />
</head>
< body>
    < div class="container body-content">
        @RenderBody()
        < hr />
        < footer>
            < p>Angular2MultiSPA</p>
        </footer>
    </div>
    < script src="/node_modules/core-js/client/shim.min.js"></script>
    < script src="/node_modules/zone.js/dist/zone.js"></script>
    < script src="/node_modules/reflect-metadata/Reflect.js"></script>
    < script src="/node_modules/systemjs/dist/system.src.js"></script>
    < script src="~/systemjs.config.js"></script>
    < script>
        System.import('app').catch(function (err) { console.error(err); });
    </script>
    @RenderSection("scripts", required: false)
</body>
</html>

NOTE: WordPress seems to filter out some of the HTML, particularly script tags. If you are having trouble please just go to GitHub to grab the source here.

Rather than repeat details of ASP.Net Core, please see the excellent documentation already covering this at https://docs.asp.net/en/latest/

You now should be able rebuild the application and see the same content at http://localhost:7010/index.html as at http://localhost:7010/home/index

Next we’ll replace the embedded angular view, which is simply an HTML string, with an HTML partial view. First add a new controller, alongside HomeController.cs called PartialController.cs in the Controllers folder:

using Microsoft.AspNetCore.Mvc;
 
namespace Angular2MultiSPA.Controllers
{
    /// <summary>
    /// Partial controller - delivers CSHTML partial views, for angular
    /// </summary>
    public class PartialController : Controller
    {
        public IActionResult AppComponent() => PartialView();
    }
}

Create a new folder called Partial in the Views folder, alongside Views/Home and Views/Shared, then in Views/Partial add a new CSHTML view called AppComponent.cshtml containing the following:
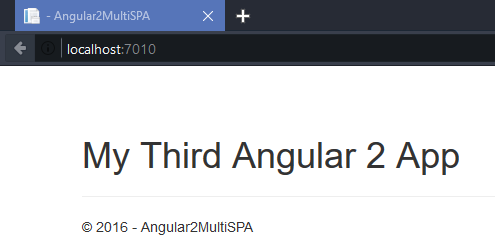
@{
    // Angular 2 now with razor :)
    string counter = "Third";
}
 
<h1>My @counter Angular {{1+1}} App</h1>

This simple snippet will demonstrate Razor syntax, albeit rather simple to begin with, and at the same time you’ll see it can be mixed with angular code {{1+1}}

Last step, we’ll change the app.component.ts file from serving embedded HTML to use the new partial component. Where app.component.ts had this:

import { Component } from '@angular/core';

@Component({
    selector: 'my-app',
    template: '<h1>My First Angular 2 App</h1>'
})
export class AppComponent { }

change it to have this:

import { Component } from '@angular/core';
 
@Component({
    selector: 'my-app',
    templateUrl: '/partial/appComponent'
})
export class AppComponent { }

You can now save changes to the app.component.ts file, then delete the original index.html file from the wwwroot folder, rebuild the app, and by browsing to http://localhost:7010 now see the partial view being rendered from our /views/partial/appcomponent.cshtml file, complete with injected server-side razor code and delivering from the server, angular code to kick in once it reaches the client.

Even though we’re only adding 1+1 for now, you now have the beginnings of a mechanism to serve intelligent pages – with ‘smarts’ at the server and at the client too.

angular-3

NOTE: WordPress seems to filter out some of the HTML, particularly script tags. If you are having trouble please just go to GitHub to grab the source here. The final source is at https://github.com/RobertDyball/Angular2MultiSPA

Next post we’ll switch across from Bootstrap3.3.6 to the new (currently alpha) Bootstrap 4, add a simple Web API service to serve up data from the server, when requested by our angular code from the browser.


(#02) ASP.Net Core + Angular 2 … adding Angular 2

Follow the Angular 2 quick start tutorials for guidance on the basics of Angular 2. We’ll be following the typescript version (nothing like extending yourself), we’ll get strongly typed code, with a structure not dissimilar to C#, and add ‘transpiling’ to ensure the typescript code gets copied and compiled into JavaScript to run in the browser.

Note: There’s plenty of explanation on the Angular 2 quick start tutorial site explaining the functions of Angular 2, typescript and how the Angular 2 boot-loader/bootstrap works, I’ll only be including details where these are altered through using ASP.Net Core or how we’ll modify things.

Add a new folder ‘app’ to the ASP.Net Core wwwroot folder, add new files to the app folder called ‘app.component.ts’, ‘app.module.ts’ and ‘main.ts’.

Copy the quick start sample contents into these, then in the root of the wwwroot directory add ‘index.html’ (just for initial testing, we’ll replace this flat html file with an ASP.Net Core .cshtml file) as well as ‘system.config.js’. Again copy into these new files the content from the corresponding files shown in quick start sample.

To get the dependencies / libraries ready to use, create a .json file called ‘package.json’ in the root directory of the project, this will contain a list of the node package manager (NPM) modules required.

Add the following content into package.json:

{
  "version": "1.0.0",
  "name": "asp.net",
  "private": true,
  "devDependencies": {
    "@angular/common": "2.0.0",
    "@angular/compiler": "2.0.0",
    "@angular/core": "2.0.0",
    "@angular/forms": "2.0.0",
    "@angular/http": "2.0.0",
    "@angular/platform-browser": "2.0.0",
    "@angular/platform-browser-dynamic": "2.0.0",
    "@angular/router": "3.0.0",
    "@angular/upgrade": "2.0.0",
    "core-js": "^2.4.1",
    "reflect-metadata": "^0.1.3",
    "rxjs": "5.0.0-beta.12",
    "systemjs": "0.19.27",
    "zone.js": "^0.6.23"
  },
  "dependencies": {
  }
}

Save the file, you should find these packages are automatically  restored by Visual Studio 2015. If you are using Visual Studio Code, or interested in what is going on, you can restore the files manually. Open a command prompt up (windows, type cmd then right click it, and select ‘run as administrator’). Navigate to the physical folder containing the root directory of the project, then type:

npm install

For this you will need a reasonable recent version of Node.js installed, go to https://nodejs.org/ if you need, install node and ensure the path is set up (if changed, you will need to re-load the cmd window).

Next we need to add a couple of new asp.net core packages to the dependencies section of project.json:

    "Microsoft.AspNetCore.Mvc.WebApiCompatShim": "1.0.1",
    "Microsoft.AspNetCore.SpaServices": "1.0.0-beta-000014"

Save project.json and again Visual Studio 2015 should restore these new packages, though you can also restore them manualy using the same cmd prompt, as above, but typing

dotnet restore

To setup typescript add the file ‘tsconfig.json’ to the root directory, containing this:

{
  "compilerOptions": {
    "target": "es5",
    "module": "commonjs",
    "moduleResolution": "node",
    "sourceMap": true,
    "emitDecoratorMetadata": true,
    "experimentalDecorators": true,
    "removeComments": false,
    "noImplicitAny": true,
    "suppressImplicitAnyIndexErrors": true
  }
}

and also add the file typings.json’ to the root directory, containing this:

{
  "globalDependencies": {
    "core-js": "registry:dt/core-js#0.0.0+20160725163759"
  }
}

Lastly edit the startup.cs file to ensure the web server is configured to serve up static files from the node_modules folder, as well as those making up the angular app itself.

Add these to the using statementsto the top of setup.cs:

using Microsoft.Extensions.FileProviders;
using System.IO;

and change the bottom section of setup.cs inside the from this:

             app.UseStaticFiles();
             app.UseMvc(routes =>
             {
                routes.MapRoute(
                name: "default",
                template: "{controller=Home}/{action=Index}/{id?}");
             });

to this:

            app.UseStaticFiles();
            app.UseStaticFiles(new StaticFileOptions
            {
                FileProvider = new PhysicalFileProvider(Path.Combine(env.ContentRootPath, "node_modules")),
                RequestPath = "/node_modules"
            });

            app.UseMvc(routes =>
            {
                routes.MapRoute(
                    name: "default",
                    template: "{controller=Home}/{action=Index}/{id?}");
                routes.MapRoute("default", "{controller=Home}/{action=Index}/{id?}");
                routes.MapWebApiRoute("defaultApi", "api/{controller}/{id?}");
                // routes.MapRoute("fallback", "{*anything}", new { controller = "Home", action = "Index" });
                routes.MapSpaFallbackRoute("spa-fallback", new { controller = "home", action = "index" });
            });
        }
    }

hit ctrl-F5 browse to http://localhost:7010/index.html and you should see this:

my-first-angular-2-app

If this doesn’t work, either grab a copy of the repo, here: Github source of this step  or check the index.html file contains this:

<!DOCTYPE html>
<html>
  <head>
    <title>Angular 2 QuickStart</title>
    <meta charset="UTF-8">
    <meta name="viewport" content="width=device-width, initial-scale=1">
    <link rel="stylesheet" href="styles.css">
 
    <!-- Polyfill(s) for older browsers -->
    < script src="node_modules/core-js/client/shim.min.js"></script>
 
    < script src="node_modules/zone.js/dist/zone.js"></script>
    < script src="node_modules/reflect-metadata/Reflect.js"></script>
    < script src="node_modules/systemjs/dist/system.src.js"></script>
 
    < script src="systemjs.config.js"></script>
    < script>
      System.import('app').catch(function(err){ console.error(err); });
    </script>
  </head>
 
  <body>
    <my-app>Loading...</my-app>
  </body>
</html>

The ‘app.component.ts’ file should be:

import { Component } from '@angular/core';
 
@Component({
    selector: 'my-app',
    template: '<h1>My First Angular 2 App</h1>'
})
export class AppComponent { }

the ‘app.module.ts’ file should contain:

import { NgModule }      from '@angular/core';
import { BrowserModule } from '@angular/platform-browser';
 
import { AppComponent }  from './app.component';
 
@NgModule({
  imports: [ BrowserModule ],
  declarations: [ AppComponent ],
  bootstrap: [ AppComponent ]
})
export class AppModule { }

and ‘main.ts’ should be:

import { platformBrowserDynamic } from '@angular/platform-browser-dynamic';
 
import { AppModule } from './app.module';
 
platformBrowserDynamic().bootstrapModule(AppModule);

if all else fails, check ‘system.config.js’ against this:

/**
 * System configuration for Angular 2 samples
 * Adjust as necessary for your application needs.
 */
(function (global) {
  System.config({
    paths: {
      // paths serve as alias
      'npm:': 'node_modules/'
    },
    // map tells the System loader where to look for things
    map: {
      // our app is within the app folder
      app: 'app',
 
      // angular bundles
      '@angular/core': 'npm:@angular/core/bundles/core.umd.js',
      '@angular/common': 'npm:@angular/common/bundles/common.umd.js',
      '@angular/compiler': 'npm:@angular/compiler/bundles/compiler.umd.js',
      '@angular/platform-browser': 'npm:@angular/platform-browser/bundles/platform-browser.umd.js',
      '@angular/platform-browser-dynamic': 'npm:@angular/platform-browser-dynamic/bundles/platform-browser-dynamic.umd.js',
      '@angular/http': 'npm:@angular/http/bundles/http.umd.js',
      '@angular/router': 'npm:@angular/router/bundles/router.umd.js',
      '@angular/forms': 'npm:@angular/forms/bundles/forms.umd.js',
 
      // other libraries
      'rxjs':                       'npm:rxjs',
      'angular2-in-memory-web-api': 'npm:angular2-in-memory-web-api',
    },
    // packages tells the System loader how to load when no filename and/or no extension
    packages: {
      app: {
        main: './main.js',
        defaultExtension: 'js'
      },
      rxjs: {
        defaultExtension: 'js'
      },
      'angular2-in-memory-web-api': {
        main: './index.js',
        defaultExtension: 'js'
      }
    }
  });
})(this);

If all else fails, again grab the repo directly from Github.

The next  part will describe how to replace the embedded HTML or static HTML templates commonly used in Angular 2 with CSHTML generated on the server. This will allow us immediately to use Razor markup to run server side code, and later we’ll also set up the project to make use of tag helpers to automatically generate code.


(#01) ASP.Net Core + Angular 2 = Angular2MultiSPA

These steps will be suitable for someone running  Visual Studio 2015 on Windows. If you use Visual Studio Code, have Linux or a Mac, you can should clone the source from Github here since the following steps require a template currently only in VS2015 for Windows.

First step, get ASP.Net Core web application framework and tools suitable for your platform.

All users (Windows, Linux or Mac) go here: https://www.microsoft.com/net/core
pick your platform, use either Visual Studio 2015 (if you have Windows and want to follow along) or Visual Studio Code (if you have Linux or a Mac).

Tip: Windows users might like to install both Visual Studio 2015 and Visual Studio Code.

Once Visual Studio 2015 is installed, make sure you run it as administrator. (Here’s how)

To start with the code from GitHub, using your favourite GitHub client go to Github here and either clone the project locally to your PC, or download the ZIP.

Alternately, to start from the beginning, In VS2015 click File, New Project, (1) select template type “.NET Core”, (2) pick the project template “ASP.NET Core Web Application (.NET Core)”,then (3) enter the filename, (4) a suitable folder, (5) check the boxes Create Directory and Add to Source Control.vs2015-new-project

then lastly click (6) OK button. Next you will be asked further details:

vs2015-new-project-2

Select (1) Web Application, then leave (2) Authentication as “No Authentication”, for now, (we will add in what we want later, rather than add clutter now), then (3) leave blank and (4) click OK to create the application.

The application will start to download it’s dependencies, or required components:

VS2015 new project 3.png

You can press Ctrl-F5 which will run the IIS Express, to host the application, and launch it to your default web browser(in my case, and for no special reason, it’s Firefox developer edition).

If you have download the code from GitHub, the website will be hosted at port 7010, otherwise it you had created the application yourself, you will see a somewhat random port, and page something like this:

vs2015-new-project-4

The next post, step #2, will cover adding Angular 2 to our ASP.Net Core app.

(Intro) ASP.Net Core + Angular 2 = building a smarter framework

After a few years successfully building a number of SPA applications using ASP.Net MVC with Angular 1.x, it was time to start connecting the pieces of ASP.Net Core, Angular 2 using Typescript, use OAuth2 / Open ID and JWT (JSON Web Tokens), and EF Core. It is hoped that this will remain cross-platform, be deployable to Windows Server or Linux – by virtue of ASP.Net Core, and a simplified deployment mechanism be employed to allow updates as well as rolling back of code and database deployments.

Many line of business applications will have a similar starting point, the fine details will vary, but you’ll have need of server and database, web services providing data, some front end user authentication/authorisation, and forms.

ASP.Net forms, ASP.Net MVC and ASP.Net Core using view state, razor, view models and so on have all relied to a varying degree on large post backs, or innumerable partial views and too much bad coupling. Hopefully this will end up differently, as we’re aiming to have the data model dynamically generate the form fields, and if practical even the whole form, as well as the Angular 2 code for the front end.

The result should be an application ‘framework’ that should at least provide a starting point, or guidance, to someone wanting a similar result and not wanting to stress over the fine details too much.

For those who want to follow along, these posts will take you step by step, though if you prefer to get straight into it, the source will be on github here, throughout the project too.

Later, as the project starts to takes shape, there should be a chance for anyone wanting to join in, to do so and submit pull requests. If you have ideas, comments in the mean time, please feel free to add them here. Later we’ll make use of the github issues.

contents of array parameters must be either readable or writable

Hopefully this might save someone else a little searching. Recently doing some work on C# code to run a NRF24L01+ on a Raspberry Pi 2 when I got this error:

In the Windows Runtime, the contents of array parameters must be either readable or writable. Please apply either System.Runtime.InteropServices.WindowsRuntime.ReadOnlyArrayAttribute or System.Runtime.InteropServices.WindowsRuntime.WriteOnlyArrayAttribute to ‘address’.

this MSDN help here on the ReadOnlyAttributeClass wasn’t all too helpful, similarly the MSDN help here for the WriteOnlyAttributeClass didn’t offer a lot of advice on what this looked like.

Fortunately this MSDN link explained clearly how ReadOnlyAttributeClass or WriteOnlyAttributeClass should be used:

In my case

    public void Configure(byte[] address, byte channel)

became:

   public void Configure([ReadOnlyArray] byte[] address, byte channel)

and all was well again. At least until I got to the next bug.

#iot, #raspberry-pi-2, #windows-10

Fix to make Server 2012 R2 Essentials Connector compatible with Windows 10 – backups are back!

Backups – from manual to Windows Home Server to Windows Server Essentials

After 2 lightning strikes and occasional HDD crashes I’ve really valued regular backups first hand, but have also realised the need to automate backups as it is all too easy to forget, get lazy and get caught out if left to chance.

Enter Windows Home Server – probably the best product no-one ever knew about.

I guess it was hard for the larger market of everyday people to understand and yet this was a real life saver. Ideal for the small 1-5 or even up to 10-man business, it just worked and worked well. Simple, inexpensive but unknown it fizzled away but had been having a problem keeping up with newer versions of Windows. Eventually Home Server was ‘replaced’ by a cut down Windows Server called Server Essentials. Still overkill for home or small business, but it came with a new issue – your PCs need to join a domain. Having no workgroup option meant some editions of windows, or the desire for a simple easy home dev network all just more complicated.

Then someone came up with a hack/workaround to allow your PC to stay in a workgroup and still connect using the Server 2012 R2 server connector. (details below)

Enter Windows 10 and it seem like Groundhog Day. The story got repeated. backups fell off again, initially the excuse given was Windows 10 Internal Preview or Tech Preview were not production OS’s.

When the final version Windows 10 upgrade compatibility report said my system (with the connector) was compatible I found the connector didn’t work, the report lied and trying compatibility settings didn’t help. Early reports were that the connector would not be available until at least September/October 2015.

compatibility report

Attempts to run the connector gave the error:
“An unexpected error has occurred. To resolve this issue, contact the person responsible for your network.”

connector issues

Workaround / fix:

This evening I stumbled across a patch linked from a forum post last year here that has Windows 10 updates!

http://www.microsoft.com/en-ie/download/details.aspx?id=40285&44F86079-8679-400C-BFF2-9CA5F2BCBDFC=1

I used the patch Windows10.0-KB2790621-x64.msu was dated 29/07/2015 with my Windows 10 x64 Enterprise desktop (running in a workgroup).

Run the patch then navigate to your Server 2012 R2 Server, download the connector but do not run yet.

Go to your download folder, in Windows Explorer, right click and change the properties to run in Compatibility Mode as if under Windows 8 (you can use the long winded trouble shooter, or just the properties as below).

compatibility mode

Follow the rest of the prompts, then if you want to not need to join a domain, and stay in a workgroup as well, then do these steps

(start of Windows Server 2012 R2 hack to avoid having to join a domain)

This useful hack/patch will allow you to leave your workstation in a workgroup and yet still use the connector:

http://homeservershow.com/forums/index.php?/topic/6334-server-2012-r2-essentials-skip-domain-join/

just prior to entering in your username and password, open up a admin windows console (Windows + X, A) then type in:

reg add "HKLM\SOFTWARE\Microsoft\Windows Server\ClientDeployment" /v SkipDomainJoin /t REG_DWORD /d 1

then open up regedit, go to
HKEY_LOCAL_MACHINE\SOFTWARE\Microsoft\Windows Server\Networking\ServerDiscovery
then open the string “SkipAutoDNSServerDetection” and change the value from True to False

(end of Windows Server 2012 R2 hack to avoid having to join a domain)

Now get back to the connector install window, enter in your server username and password and follow the rest of the prompts and voila, you have been connected!

connected to server

The new blue screen? Windows 10 Setup error “Something Happened”

Have to laugh, thought I’d try the new Windows 10 media creation tool, picked the option to do an upgrade (as opposed to prepare media for another PC) and got this:

"Something Happened"

“Something Happened”

<sigh>

sorry to those who worked hard on Windows 10, I suppose this is a little like living in a glass house and throwing stones, but it does look nice – a new shade of blue and it doesn’t fill the whole screen (more later)…

Fix for Raspberry Pi 2 install Windows 10 Error 87 – and (bonus) how to setup your SD card using Windows 8.1

thanks Carl & Richard listened to DotNetRocks – episode 1143 at work yesterday, found Windows 10 IOT was out (been waiting 2 months, missed seeing emails from Microsoft <sigh>) Raced home to try it, found according to both Microsoft’s IOT site here and Scott Hanselman’s great guide here I needed Windows 10 on my PC to install Windows 10 IOT on the SD card for my Raspberry Pi 2.

Impatient I tried dism.exe directly from Windows 8.1 but (surprise) I got an error:

Deployment Image Servicing and Management tool
Version: 6.3.9600.17031
Error: 87
The /applydrive option is not recognized in this context.
For more information, refer to the help.
The DISM log file can be found at C:\Windows\Logs\DISM\dism.log

error 87 effectively means that dism version 6.3.9600.17031 from Windows 8.1 is now superseded; the new Windows 10 version, ver # 10.0.10074.0 is smarter-er, knows what the new /applydrive switch is supposed to do 🙂

Windows 8.1 users should still probably get Windows 10 going somewhere to use all the new Win 10 stuff under Visual Studio 2015, but for other impatient folks (like me) to get the SD card set up quickly under windows 8.1, do this:

1. Download  Windows10_InsiderPreview_x64_EN-US_10074.iso to your PC from Microsoft

2. Mount the ISO image, (don’t install it yet- unless you really want to!)  copy the whole  .\sources\ folder across to your Windows 8.1 HDD, (I didn’t bother chasing down all the dism.exe dependencies, and there’s more than the few like named DLLs – maybe later). Say C:\TEMP\

3. Get the file Windows_IoT_Core_RPI2_BUILD.zip from Microsoft. Follow the steps here to sign up to MS Connect etc.

4. unzip the file, from among the contents copy the file Flash.ffu into the same folder as you copied the Windows 10 .\sources files, say C:\TEMP\

5. Put your SD card into your PC

6. use either Powershell (per Scott) or DISKPART (per Microsoft) to find the disk that is your  SD card (be careful, may not be good to get the wrong drive #).

7.from a command shell / dos window, running as admin  (just hit windows-x, then a), change to your C:\TEMP (or other) folder

8. using your drive number in place of the “N” below type:

dism.exe /Apply-Image /ImageFile:flash.ffu /ApplyDrive:\\.\PhysicalDriveN /SkipPlatformCheck

note. it is much easier if the Windows 10 dism and the flash.ffu are in the same directory.

9. Wait a minute or two as it writes out, and then eject the SD card (use the eject, or if mounted in a USB carrier – use the USB eject).

10. put the SD card in your Pi 2 and wait – it takes a minute or two to completely boot up, but it will get there.

Possible gotchas. I had a fail initially, I had formatted the SD card using FAT32. Tried to boot, nothing happened. Second time lucky, a quick reformat of the SD card using NTFS, same steps, and this worked. Was it a fluke? Unsure, but not losing sleep yet.

windows 8.1 running windows 10 dism to install Windows 10 IOT on raspberry pi 2

Enjoy!

“Some of the properties associated with the solution could not be read” error + “See the Output Window” in VS2013

one or more of the projects in the solution were not loaded correctly

“one or more of the projects in the solution were not loaded correctly”

a look at the output window, as suggested was not very helpful:

Some of the properties associated with the solution could not be read

Some of the properties associated with the solution could not be read

The solution still loaded, CI Build was fine, TFS and Octopus deploy happy.

The answer: the problem turned out to be in the .sln solution file, two sets of projects were listed:

The fix: at the root of the solution (in my case) in Visual Studio 2013, right click, open folder in file explorer.

Use an editor like Notepad++ to edit the solution, and look for the phrase:

GlobalSection(TeamFoundationVersionControl)

followed by

SccNumberOfProjects = 

chances are there’s more than one of these. One needs to go, find which contains the correct projects + correct number of projects. In my case I had 2 of these sections. One section had SccNumberOfProjects = 10, the other SccNumberOfProjects = 9. I needed only to delete the block with the incorrect number of proejcts, bounded by these:

GlobalSection(TeamFoundationVersionControl) and EndGlobalSection

save the updated solution file, then let Visual Studio reload the solution following this change and things should return to normal.

#visual-studio-2013

Don’t do this at home! … Windows 10 Preview + Server 2012 R2 Essentials Connector

or the perils of not really taking notice of the fine print.

Had some issues with my current build; thought time to blow it away, and why not have a crack at Windows 10. After it was not the first preview, and I wondered how it would go bare-metal instead of testing it in a VHD as I had in earlier releases.

The info at Preview-FAQ said Windows 10 Insider Preview is here today, but it’s a long way from done. We’re going to make it faster, better, … “ etc. and of course the usual warnings “Unexpected PC crashes could damage or even delete your files, so you should back up everything …”. Anyway I was even further was encouraged to try on my main machine after seeing that I could probably expect this preview would allow the ‘real’ Windows 10 to be upgraded into it and installed later, what better way to get a head start on Windows 10 development.

Unexpected – Windows 10 Insider Preview didn’t work with Server 2012 R2 Essentials connector, it almost thought about loading in compatibility mode, pretending it was Windows 8.x, but failed too. Seems this is high on the wish lists but still not in the features currently delivered.

Totally unexpected – found after Windows 10 finished installation on C: drive, a 1TB SSD that it decided to delete the partition on my D: drive.

End result, back to Windows 8.1 and to start the undelete of a 1TB of stuff that was my D: drive .